1957 Corvette RestoMod Story – Page 7
Replace C4 Lower Control Arm Ball Joints
The C4 Corvette is a marvel of machinery. First made in production year 1984, the C4 was a completely new approach to the American sports car. The Corvette C3 era had lasted since 1968 and the chassis needed an upgrade. Enter the C4.
On this page of my RestoMod story, the ball joints in the lower control arms have posed a problem. Most old mechanics will say, “Just take a hammer and socket and bang the damn things out.” On the C4’s aluminum control arms, THIS IS WRONG!
As you will see in later pages, I did eventually buy a small hydraulic press. But I didn’t have it when these ball joints needed extraction. So without a press, this is one area where I needed a machine shop’s help. I focused my search on shops that routinely deal with Corvettes.
After three tries to press (more like a push) out the lower ball joints, I surrendered to my last resort. I say last resort because this project is going to be completed with as little assistance from restoration professionals as possible. I want to show YOU, the novice just like me, how to build your C1 Corvette RestoMod yourself.
Now I’m not stupid or naïve to the point of believing that I could do all the work. But I want to limit the amount of outside help I receive. And for very good reasons – to save money, and to learn the crafts myself. Kind of a renaissance man approach (no giggling please).
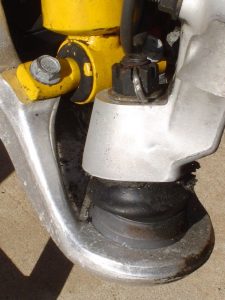
If you’re scratching your head wondering what a ball joint is and what it does, follow along. Pictured upper right is an installed control arm with ball joint. The joint has a stud that goes through the steering knuckle and is fastened by a castle nut and cotter pin (center of photo).
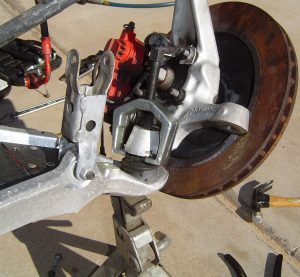
The bottom photo shows how the puller separates the ball joint from the knuckle. Now I just need to press out the ball joint body from the lower arm.
DON’T EVER USE A HAMMER TO GET THE BALL JOINT OUT! You will probably damage the aluminum control arm and you don’t want to buy another one – Expensive!
A quick search on the internet resulted in finding a shop that would help me. I purchased the new upper and lower ball joints online from Jegs with no problems. The ball joints are made by Moog, which is a trusted name in aftermarket suspension parts.
As you will see later, I bought a small 12-ton shop press from Harbor Freight – and it might be the best tool purchase of the project.
You will also need a ball joint kit. It comes with various adapters to press the ball joints in and out of your lower control arms. These can cost near $200 new. But you can also rent these from auto parts stores such as O’Reilly’s and Autozone. Just make sure the kit has the correct adapters for C4 suspensions.
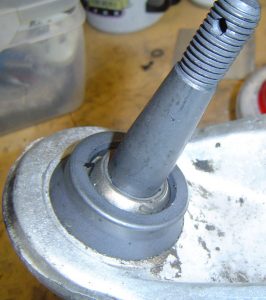
At left, the ball joint is correctly pressed in place as seen by the top of the control arm. Note the flange is seated all the way down to the arm.
Only the pressure of a hydraulic shop press can produce enough force to press the ball joint into the control arm without damaging it.
When I first arrived at the shop, the owner quickly inspected my lower control arms. Using pieces from a couple of ball joint service kits, he used his shop press to remove my lower ball joints. The center stud popped out first and then he pressed out the outer flange. Next, he pressed in the new Moog ball joints (seen above). In all, it took about 15 minutes.
As an amateur, it’s reassuring to know there are knowledgeable and experienced professionals out there. If I get stuck, these pros are there to help me – at a price.
But again, the main reason I did this project is to say I built it. Then I’ll enjoy the fruits of my labor by driving the daylights out of the car.
See Chapter 5 of my new book to see all the details on how I removed my Grand Sport front bushings and ball joints.